Saturday, November 30, 2019

Physics Behind a Train Accident

While I was procrastinating doing my work this week, I found an account called "historyphotographed" on Instagram, and started scrolling through it. Of the many interesting pictures, one stood out to me in particular of a locomotive suspended over a street after running off the end rails.

After seeing this image, I wondered what the locomotive's momentum was, and what force it had when it crashed into the wall. I was able to find an archived article in the Los Angeles Times about the accident, which took place on January 25, 1948. Today, the average Amtrak locomotive weighs about 150 tons, and the average Amtrak passenger car weighs about 65 tons. According to the article, the Santa Fe Diesel passenger train weighed about 300 tons, or 600,000 pounds. Additionally, the train was moving 2 to 3 miles per hour.

To calculate the momentum of the train, I used the equation:
p = mv
m = 600,000 lbs or about 272,155 kg
v = approximately 2.5 mph or 1.12 meters per second

Therefore, the locomotive's momentum was about 304,814 kg*m / s.

To calculate the force at which the train struck the wall, I used the equation: 
F = m * a
Since the acceleration of the train was unknown, I used the equation:

F = m * (Δv/Δt) 
Δv = 1.12 meters per second
Δt = 54.5 seconds

I hypothesized that the train travelled a distance of 200 feet, or about 61 meters, between the station and the wall that it crashed into. Therefore, the Δt would be about 54.5 seconds.

By plugging in these values into the new equation for force, I found the force at which the train struck the wall to be about 5,593 N. 

Thankfully, the train was not moving quickly, and the wall was able to prevent the train from crashing onto the street below despite the force in which it hit the wall. 

The Unfortunate Physics of Bike Frames

One of my best friends from home, Mia, is a huge mountain biker, and every time we come home (Thanksgiving and winter break being no exceptions), the two of us always talk about the possibilities of going out for a ride together. Mia and I are both huge fans of trail riding, which can involve both climbing hills, and riding down steep, uneven trails with often rocky or root-ridden terrain. However, in the past several years, my family has cleaned out our garage and gotten rid of many of our old bikes, leaving me bike-less.


This past summer, Mia had to warranty a bike frame that she had been using since high school (shown above; truly a loss), and she chose to invest in a new bike. However, from the warranty, she also received a brand new version of her old Juliana Furtado frame. She had been considering what to do with the new frame, but given my predicament, she offered to sell it to me and help me build a bike! Sounds perfect, right? Sadly, no...

One intuitively knows that bikes are not one-size-fits-all, otherwise children and adults would be riding around on the same sets of wheels. However, when it comes to more specialized bikes, these frame sizes and shapes become more important, especially when it comes to one's center of mass on the bike and the effect this has on the ride itself. 

When buying mountain bikes, they often come in XS-XXL sizes from the manufacturers, with each size approximated to fit riders of certain height and/or weight ranges. For the size-small Juliana Furtado frame that Mia received, this range is between 5'2" and 5'6", with Mia standing at about 5'2" fitting perfectly in the range. I am roughly 5'6", which is theoretically the upper limit of the size-small range, but this is where weight also comes into play. In general, humans have a center of mass located at their lower stomach/hip area. While the difference in height between Mia and my centers of mass is relatively small, the size of our centers of mass differ depending on how much we weigh. When riding a bike, balance is extremely important for staying on two wheels, but it becomes significantly more important when going at reasonable speeds on uneven terrain. As a result, having a center of mass that is higher off the ground on the bike can lead to greater imbalance during the ride, and a higher risk of wiping out... This I know from experience... Given that I weigh approximately 20-30 lbs more than Mia, our centers of mass are likely different enough that if I were to ride the same bike frame, I would likely have to compensate in other ways for my larger center of mass, even though we are only four inches different in height. In some ways, this could be accomplished through changing my positioning on the bike.

Relaxed Road-Biking Posture
Downhill Posture
Uphill Posture

For road biking, it is common for riders to sit with a bit of a relaxed, slightly inclined posture (shown above). In physics terms, this positioning causes the rider's center of mass to be roughly where the rider's hips are on the seat, in the approximate center of the bike. However, this posture is largely only favorable in flatter conditions. When riding down steep terrain, having a centralized center of mass not only leads to imbalance on the bike, but also can result in unintentional increase in speed while riding. This I also know from personal experience... Instead, for mountain-biking downhill, it is much more favorable for riders to stand with their pedals level, and lean their hips back over the back wheel (shown above). This position shifts the center of mass of the rider + bike toward the back wheel of the bike, and lowers the center of mass to the ground in comparison to if the rider were seated. However, when climbing, it is far more favorable to stand and lean forward (shown above), shifting one's center of gravity over the pedals and toward the front wheel to increase traction and pedaling power. Unfortunately, this also results in a higher center of mass on the bike but is unavoidable when riding trails. 


Riding a bike takes much more than just balancing on two wheels, especially in trail riding. Almost all bike frames have the same basic structure of a top tube and a down tube that connect to the head tube, seat stays and chain stays that hold the back wheel, and a seat tube. However, different types of bikes have differences in their structure and the geometry. 
On the left is a generic road bike. Here, there is no suspension built into the frame, and both the top tube and down tube are relatively equal in thickness. Also, the seat stays are directly connected to the seat tube where the head tube reaches the seat tube. Similarly, the fork (part that holds the front wheel) has no suspension, and comes with the frame. On the right is Mia's beloved Juliana. Here, the bike is full suspension. The fork is separate from the frame, allowing one to choose how much cushion they want in the front of the bike, and the seat stays and chain stays (now also much studier) are no longer connected directly to the seat tube. Instead, they are connected via a shock absorber to the top tube. These differences in construction are designed to help each bike deal with the stresses of their aspects of the sport appropriately (physics currently beyond our understanding in this class). There is a noticeable difference in the geometry of the bikes as well. For the road bike, the construction of the frame appears to be much more level, with the top tube parallel to the ground. However, for the trail bike, there is a more of an angle to the frame overall. This is especially noticeable for the angle of the head tubes, or the head angles of these bikes.
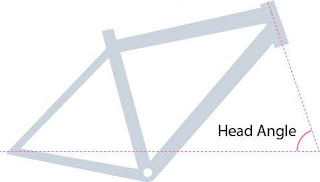

The head (tube) angle dictates the ability of the suspension (especially the front suspension that fits through the head tube) to absorb impacts while riding, and can affect how easy it is for the rider to control the bike. Having a slacker (smaller) head angle can make the bike less responsive to steering in tight corners, but can allow the bike's suspension to better absorb impacts while riding downhill and increase stability since the wheels are further apart. Having a steeper (larger) head angle can make the bike easier to ride uphill and easier to handle on winding tracks, but can also feel less stable at high speeds and more like you might be flung over the handlebars. For most trail bikes with 27.5" wheels, this head angle generally ranges from about 66.5 to 68 degrees, with mountain bikes generally ranging from 62 to 73 degrees.

According to the specifications for the Juliana, the head tube angle is a fairly slack at ~66.5 degrees, making it more well balanced for downhills but still good for climbing. Given the position of the the rider's center of gravity over the bottom bracket (where the pedals attach), this geometry makes for more efficient transfer of force from the rider's pedaling to the rotation of the wheels as well, since the rider's weight can be leveraged when pedaling. However, the slack of the head angle does not help my situation much. Since the bike would be fairly slack, my center of mass would be slightly lower than if I used a different bike with a steeper head angle, but this geometry would not help my case much, given the difference between a 66.5 and a 68 degree head angle would only translate to mild differences in the wheelbase (distance between the tires). In this way, the Juliana Furtado could be a slightly more forgiving frame as far as trail bikes go, but only by a small margin.

There are other aspects to consider when buying a bike, including comfort, reach, etc., but in the end,  I sadly had to turn Mia down because of my worries about the fit of the bike frame impairing our trail adventures, among other reasons. However, hopefully, with this knowledge of the physics of bike frames, I'll be able to find one that will get me back on the trails on a bike, and not on my face.

Physics of a Concussion

A few weeks ago, I got elbowed in the head during basketball practice and was diagnosed with a concussion.  I began to wonder about the physics of what I had experienced.  How much force was applied to my head from the elbow?  How fast was the elbow going when it hit my head?  With some research and some approximations I was able to answer these questions.
A concussion is a traumatic brain injury that is caused from a collision or whiplash where the brain and the head shake rapidly back and forth.  Symptoms are highly variable depending upon the severity of the injury, but may include memory problems, confusion, irritability, balance problems, and dizziness.  Recovery also varies with severity, but may last several days to several months.  Most concussions deliver about 95 g's upon impact.
Image result for concussion
The upper arm of an adult male is about 3.25% of the body mass.  If the person who elbowed me were 97 kg, then the mass of the elbow would be 3.2 kg.  With an elbow of this mass, 1 g would be equivalent to 31 N (mass x gravity).  Thus, the force necessary for the elbow to cause a concussion would be 2945 N (95 g's).  With the force that was applied to my head known, Newton's second law can be applied to find the speed at which I was hit.
F=ma
If the force was 2945 N, and the mass was 3.2 kg, then the acceleration would have been 920 m/s^2.  The elbow was at rest about arm's length away before it collided with my head.  My arm is 0.84 meters long.  With a simple kinematic equation, the speed of the elbow can be found.
vf^2 = vo^2 + 2a(xf − xo )
By using this equation and solving for the final velocity, the velocity of the elbow was found to be 39 m/s.  39 m/s is equal to 87 mph.  
This research found that my concussion was caused by an elbow applying 2945 N to my head at a speed of 87 mph.  
Sources:

How to Win the Wishbone Game at Thanksgiving, Through Physics

Every year at Thanksgiving, my brother and I have this tradition of breaking the wishbone of the turkey from last year's Thanksgiving. Whoever gets the larger part of the wishbone then gets to make a wish. This tradition actually dates back to the Ancient Romans as they were the first to consider the bone lucky. Now this tradition has slowly changed over the course of history to include the turkey wishbone as well, making it the perfect Thanksgiving tradition. In case you don't know what the bone I'm talking about is, here's a picture of it:
 
The wishbone is the forked chest bone in birds where the two clavicles are fused together. It is very symmetrical in shape and might make you assume that the bone is likely to snap in half if equal force is applied to either side. Now, this almost never happens. My brother and I have never snapped a wishbone perfectly in half and physics can explain why. Physics is actually the key to winning this game. So let's look at two very important equations:

Pressure= Force/Area
Torque= rFsin(theta)

Pressure is ultimately what causes the bone to break, so the first equation is important to consider when choosing which side of the bone you want. Assuming my brother and I apply equal amounts of force to each side of the bone, the side with the greater area would have less pressure. Based on this, in order to win, you should choose the side of the bone that is slightly thicker as it would have a greater area and therefore, less pressure would be exerted on it. However, it is unlikely that my brother and I would apply the same force to the wishbone as he is significantly stronger than I am. Because of this, he most likely applies more force to his side of the wishbone than I do. So in order to win, all I have to do is let him pull more than I do and the pressure on his side will exceed mine due to the greater force applied, causing his side to snap. 

Understanding torque also helps to win this game. In the torque equation, r represents the distance from the axis of rotation. In the wishbone, the axis of rotation is the middle point of the bone. Knowing this, situating your hand closer to the center of the bone will minimize the torque on the bone and minimize the force applied as torque is directly related to force. Less force will result in less pressure and decrease the likelihood of the bone breaking on your side. If you were to put your hand at the very bottom of the bone and apply force there, the torque would be much higher because the distance from the axis of rotation is higher and would result in the bone snapping on your side. 

So turns out that you don't really need luck at all to win the wishbone, you just need physics! 

Disclaimer: I haven't actually tested out any of these tips so I can't guarantee a 100 percent success rate. 

For more information on wishbones and the physics behind it:


The Physics Behind Your Holiday Food Baby

It’s that time of year again! Holiday season. And for many...feasting season. There’s no better way to celebrate than to share a meal with friends and family, helping yourself to more than just one generous serving of your Thanksgiving favorites. Mashed potatoes, stuffing, turkey, gravy, cranberry sauce, more potatoes, and an assortment of pies...yes please! 


I’ve always had a rather big appetite. But when Thanksgiving comes around, year after year, I tend to push my stomach’s limits by indulging in all the delectable dishes on display atop my dining room table. 


This Thanksgiving has been no exception. I first started with a hefty round of appetizers. And though I went pretty hard on the cheese board, I made sure to save room for the main course! I filled my plate with a little bit of everything and once I had demolished round one, I proceeded to go for a second helping while washing everything down with some carbonated sparkling cider. Later, when the desserts were laid out, I naturally had to have a little of everything...pumpkin pie, pumpkin cheesecake, pecan pie, and vanilla ice cream. 


It’s safe to say that my dining experience this past Thanksgiving left me feeling a bit bloated...as was expected. But after a hearty Thanksgiving meal, what makes you feel like you may be in the early stages of pregnancy with a food baby? The answer lies in physics. 


Our digestive systems, comprised of the esophagus, stomach and intestines, can be thought of as a closed system. Each time we swallow when we take a bite of food, air molecules go along for the ride (this is increased when drinking soda or beer). Air molecules are a gas. Gases spread out and fill the volume of the space they occupy. So, when you eat, gases expand in the gut. 

The stomach can stretch to a volume of about 1 L (this is about the size of a burrito). Volume is a measure of Area x Height. Therefore, each individual’s stomach capacity may vary. When we eat in excess, however, and stretch our stomachs beyond comfort, it squeezes against other organs in our bodies, making us feel full and sometimes even in pain. 
When your stomach and intestines are filled with gas, the inside of your digestive system increases in pressure. Bloating occurs when the gas trapped in your digestive system creates an uncomfortable internal pressure. In other words, when the internal pressure within the digestive system is higher than the external pressure of the body cavity, the gas molecules within the stomach and intestines have more force pushing outwards, causing discomfort. According to the formula for pressure

Pressure = Force /Area

the greater the magnitude of force perpendicular to the area, the greater the pressure. If you continue to consistently eat large quantities of food overtime, it is possible that the stomach may stretch. If this occurs, the area of the stomach subsequently increases, and more gas molecules (i.e. more food/drink) must be consumed in order to reach the same amount of internal pressure for that full feeling. Lastly, temperature is a measure of the energy of movement. The more kinetic energy in a system, the more pressure a gas in the same system exerts. Since our body temperature is usually higher than the air we breathe, more pressure may be felt within the digestive system as it fills with gas. Thus, the body’s warm internal environment may also contribute to that bloating sensation after overeating. 

So, according to the physics laws of pressure, gases, and kinetic energy, we can all be more aware of what really goes on inside when we feel that food baby forming. Concepts of pressure and the movement of fluids apply to our body’s internal environment just as much as our external environment. Though that bloated feeling we get after a huge meal is not the most pleasant, I say, as long as you aren’t eating until your stomach hurts on a regular basis, go ahead and feast! It’s all part of the holiday joy. For now, my stomach needs to rest up for Christmas. 

Sources


Hiker’s Knee: Using Physics to Examine Causes and Solutions


Over break I spent a lot of time hiking. By the end of the week, I had a small case of hiker’s knee, or aching knees with each step. Interestingly, knees actually undergo more stress when walking downhill than walking uphill. In both instances, one bent knee bears the entire bodyweight mid-step (front knee for uphill, back knee for downhill). When moving downhill though, there is the additional force of impact of each step on the other extended knee. This front knee, as a mobile weigh-bearing joint, bears both the weight of the hiker (as it does when standing still) and the reciprocal force of impact with the ground per Newton's third law. In fact, in a paper Kuster et al. (1994) published in Knee Surgery, Sports Traumatology, Arthroscopy, it was found that the hiker’s knee can absorb forces up to 8-times greater than the hiker's bodyweight when hiking downhill. Accordingly a 60kg hiker could have 4700N applied to their knee with each step. That much force exerted onto the small surface area of the knee cap results in a lot of pressure felt by the hiker, per the equation F=PA. Over long distances with little rest, this repeated stress can contribute to the aches of hiker’s knee. Plus, since people tend to walk faster downhill due to the assistance of gravity, the steps are often more bounding and result in more forceful impacts.
So, how can you prevent hiker's knees? One option is to use a walking stick or hiking poles. Hiking poles are usually lightweight, so they add little extra mass to the hiker’s load, minimizing additional stress on the knees. They help by redistributing the weight of the hiker, as there are now four points of contact with the ground. When moving uphill, the arms/shoulders now exert some force so that the legs have to do less work per step. When moving downhill, the arms support some of the bodyweight, reducing the force of impact on the knees. Specifically, a study in Journal of Sports Science by Schwameder et al. (1999) cited a 12-25% decrease in amount of force felt by the knee when using hiking poles to walk down a 25° incline compared to using no poles. As an added plus, using poles improves posture so that hikers are more likely to maintain their center of mass above their feet while hiking downhill instead of leaning backwards and causing the muscles to need to expend more energy to compensate.
Another option to ease the stress placed on your knees is to invest in better hiking shoes. Shoes that have more cushion in them increase the time of impact for each step, thereby decreasing the force felt on the knees per the equation ΣFΔt=Δp. Both of these options are common pieces of advice given in the hiking community to help alleviate stress on the knees, and I can now support them with physics.

With that, happy hiking and remember to protect your knees!

Friday, November 29, 2019

Deer Physics and Winter Weather

As winter kicks into full gear, rural communities like Hamilton will see an increasing number of deer active on roadways. Hunting season tends to result in deer moving around frequently, which can be especially bad when combined with increased hours of darkness in the winter, where deer are harder to see while driving. Last year in New York, according to AAA, there were an estimated 60,000-70,000 accidents involving deer, and some NY repair shops report three times as many deer-related repairs in their shops in winter months compared to other seasons. Considering the relationship of cars and deer--an obstacle on the road--has many connections to physics!


Braking and Friction:
When you see a deer on the road, your ultimate goal is to stop your car before reaching the deer. Thanks to modern advancements, most cars have anti-lock braking systems, which are significantly more effective than traditional breaking at quickly stopping your car. With anti-lock brakes, the car rapidly and repeatedly “presses” the brake, rather than just pressing and holding the brake. Anti-lock brakes work well because they allow your car to maintain static friction to stop. With normal braking, the car would stop via kinetic friction, as the wheels are locked and the car is sliding (rather than rolling). The static coefficient of friction is greater than the kinetic coefficient of friction, which explains why anti-lock braking can be so much more effective than traditional braking.


Friction and Weather:
Now let’s consider how the weather could play into our interaction with the deer. Under normal conditions, we can estimate the static coefficient of friction to be 0.70 for our car’s tires on dry asphalt. However, this same car may have a static coefficient of friction of just 0.40 in rainy conditions (and even lower in snow and ice)! When braking, the force of friction between the car tires and the asphalt is what stops the car. The force of friction is equal to the coefficient of friction, μ, times the normal force. The normal force for a car traveling in the x-direction on a flat surface should be equal to the force of gravity (mg). Therefore, normal force is not impacted by the dryness or wetness of the road. Considering our different static coefficients of friction:

Dry: F(fr)=0.70*F(N)
Wet: F(fr)=0.40*F(N)

Above, F(N) is the same magnitude in both cases. Thus, wet roads have a reduced force of friction, and therefore have an increased stopping distance. That means it's especially important to be vigilant for deer in the distance when driving on wet roads!


Speed and Collisions:
In the unfortunate case that you are unable to stop before the deer, let’s consider the resulting collision. If we treat the deer as a “wall” (in this case, it won’t move), we can examine the effect on the car at different speeds. Let’s consider a 1300kg car that stops over 0.05s when colliding with the deer.
If traveling at 25m/s (about 55mph):
Momentum (p) → p=m*v → p=1300*25 → p=32,500kg*m/s
Force (F) → F=m*a, where a=delta v/delta t
a=(25-0)/(0.05-0) → a=500 m/s^2
F=1300*500 → F=650,000N

If traveling at 15m/s (about 35mph):
Momentum (p) → p=m*v → p=1300*15 → p=19,500kg*m/s
Force (F) → F=m*a, where a=delta v/delta t
a=(15-0)/(0.05-0) → a=300 m/s^2
F=1300*300 → F=390,000N

Recalling Newton’s Third Law, for every action there is an equal and opposite reaction, the force exerted by the car on the deer will equal the force exerted by the deer on the car. Look at those two forces above….. A difference of just 10m/s has a difference of 260,000N!!!! This is good to remember when driving during times of heavy deer traffic, as driving slow can significantly reduce the damage done to your car in the event of a crash. Just because most of the speeds near Hamilton are 55mph doesn’t mean you have to drive that fast!


Coefficient reference: http://hyperphysics.phy-astr.gsu.edu/hbase/Mechanics/frictire.html

Physics in Frozen II (minimal spoilers)

The Wind Spirit

I don't want to give too much away because you might want to see the movie, but there is a scene in which all of the characters get sucked into a tornado that is produced by the Wind Spirit, who is appropriately named Gail (play on Gale - a very strong wind). So, this made me think about Physics class and rotational motion in particular. Basically, I was wondering how the tornado works. I found the Fujita scale online that categorizes tornados and their speeds, and I figured that Disney would have chosen the tornado to be "Gale"-sized because that is what they named this spirit. This corresponds to wind speeds of about 40-72 mph. I chose 50 as an intermediate and converted it to m/s. The smaller radius for a tornado is about 300 ft and the largest is 1 mile. I chose 500 feet as a reasonable size for this smaller tornado.
50 miles / hour * 1 hour/ 3600s * 1609 m / 1 mile = 22 m/s
500 ft * 0.3048 m/1 ft = 152 m
Using the above information, I calculated the angular velocity of the tornado by V= wr and got 0.145 rad/s. 
So, when Anna, Elsa, Olaf, Kristof and Sven all get sucked into the tornado, you would think that it might slow down its rotation because they were previously at rest and now you must add their moments of inertia up, use conservation of angular momentum, and find the new angular velocity. 

But, in the movie, this happens and then everyone except Elsa gets expelled traveling radially, meaning that they are moving in their rotational path while exiting. The angular velocity of the tornado should not change in this instance because each body takes it angular velocity with it and therefore the overall momentum is conserved. However, the tornado actually speeds up after they're all ejected. This is not in accordance with conservation of momentum! Elsa then uses her ice powers or whatever it is that she is supposed to have and stops the tornado. Let's assume that the speed stays at the Gale speed of 22 m/s, or 0.145 rad/s. When she is trying to stop the motion, there is no translation. So, she needs to provide enough torque to stop the motion. She does this in about 15 seconds, so I use kinematics to find acceleration. 
Vf=Vo + at
0 m/s = 22 m/s + a (15s)
a = -1.47 m/s 
Now, I don't know if the mass of a tornado can be known, but it is interesting that Elsa can exert enough force to slow the tornado down by this much. Overall, I don't know if I can call this "bad physics" because she is supposed to be magic, but I know that it definitely piqued my interest and I highly recommend seeing the movie! 


Debunking Flat Earth


As an avid lover of conspiracy theories, I recently found myself sucked into the black hole that
is “Flat Earth Theory”. As crazy as it sounds, supporters of this theory claim that the Earth is
a flat disk, that it does NOT rotate nor orbit around the sun, that gravity does not exist and,
obviously, that there are no real proofs that the Earth is round. Just for fun, I have attached
below a picture of their model of the Earth.


But why do the Flat Earthers reject the round model of the Earth? And how do we actually know that
the Earth is round? One of the claims that Flat Earthers utterly reject is that, on the account of Earth’s rotation around its axis, someone on the surface of the Earth is moving at a speed of around 1000 miles per hour!!!
v=w*r=[2*π/(24*3600)]*6.371*1,000,000=463 m/s=1036 mph 


Flat Earthers will say that this is outrageous and if the Earth was truly rotating at such speed we
would feel it. But if everything else around you is moving at the same speed, would you notice it?
Think about being on an airplane that is cruising smoothly through the air. As long as there is no
turbulence or abrupt stops, you would not know how fast your moving! 


But this in itself neither proves nor disproves that the Earth rotates.
Can we actually measure the Earth’s angular rotation? It turns out that we can!
To do that we will rely on a super cool device called a gyroscope and our concepts of rotational motion. 


A gyroscope is a very simple device that consists of a central rotor and three supporting rings
called gimbals.These gimbals consist of friction-less bearings that isolate the central rotor from
outside torques. In other words, if we rotate the rotor along its spin axis, it will resist torques in other
directions (along other axes of rotation) due to conservation of angular momentum. Thus if we have
a spinning gyroscope on the surface of the Earth for long enough, it will appear as if it’s spin axis is
completing a rotation in 24 hours, but really the axis itself is not moving (since it resists rotation in
other directions), it is us and the Earth that is moving!


You can see this illustrated and explained in greater detail in this video: https://www.youtube.com/watch?v=XHGKIzCcVa0
Most importantly, however, using high sophisticated gyroscope, people have been able to measure the angle of Earth's rotation and from that, its angular velocity. Thus, we do have proof that the Earth rotates!

Sources:

Tuesday, November 26, 2019

The Physics of Hill Wipeouts on Colgate's Campus

As winter approaches and weather conditions become more slippery, the giant hills that elevate our beautiful campus become ever more dangerous. For example, as a fourth year student at Colgate, I can confidently argue that I see many more wipeouts on the hill that leads down to the library during the winter months in comparison with the fall and spring. People fall down the hill, whether it be from slippery snow, ice, rain, or mud, as their friends laugh at them and (sometimes) help them up. It was not until recently when I saw this graceful pattern start up again that I critically thought about the physics involved when students tumble down the infamous hill that leads to the front doors of Case Geyer Library. 

If we think about the forces that act on students as they walk down the hill to the library, we see a difference based upon weather conditions that impact the frictional force that opposes motion and more specifically, slipping and falling. In the warmer months of the year when there is no snow, ice, rain, or mud, students have an easier time walking down the steep hill that leads to the library. This is because as students walk down the hill, either on the pavement or in the grass, the forces of gravity, the normal force, and friction are all acting on them while their gravitational potential energy is converted into kinetic energy. 

Fy = may = FN - mgcosѲ → FN = mgcosѲ + may
Fx = max = mgsinѲ - Ffr = mgsinѲ - μFN mgsinѲ - μ(mgcosѲ + may) = max μ will decrease when friction decreases during winter months, which will increase acceleration in the x-direction, making it easier to slip and fall 

KE = -PE + WNC
1/2mv^2 = mgh - Ffr x displacement → when friction decreases, KE will increase

However, we cannot ignore the work of non-conservative forces at play. The key here that typically helps keep students from falling and thus opposes their motion down the hill is the force of friction. Because students are walking down a steep decline, the gravitational force is strong and as a result, one may feel as though they are speeding up as they get closer to the bottom of the hill. This is because the gravitational potential energy at the top of the hill is being converted into kinetic energy as one moves down the hill. The steeper the hill gets as one moves down it, the more they accelerate. However, the force of friction is also at play here as a non-conservative force, which means that not all of the gravitational potential energy is converted into kinetic energy. Especially when the ground is dry, this frictional force prevents students from falling down the hill by opposing forward motion and thus slowing people down and decreasing their kinetic energy. 

So, as you can imagine, when things like snow, ice, rain, and mud come into the picture, slipping becomes much more likely. This is because when we have these conditions, the frictional force, μFN, decreases. There is less traction between our shoes and the ground, causing us to slip and fall as our kinetic energy moving down the hill increases and the work of the non-conservative force decreases. I always find myself making a conscious effort to trudge down the hill at a slower pace when there are bad weather conditions to decrease my chances of falling, but I have never stopped to think about how physics plays a huge role in why I choose to do so until now!